
A beautiful stain can’t compensate for wood that’s damp, mildewed, or still holding a failing finish. For wood staining for outdoor furniture in Carefree, clean the furniture, remove mildew and loose finish, let the wood dry completely, then sand and apply stain with the grain. Allow the finished piece 24-48 hours to cure before use.
It’s tempting to choose a stain color first, but careful preparation is what helps the finish look even and adhere properly. The right approach also depends on the furniture’s condition and how much of the wood grain you want to show.
This guide covers preparing outdoor wood, removing mildew and weathered finish, choosing a stain, applying it without building an unwanted film, and allowing it to cure. Follow these steps, and consider professional wood staining and refinishing when the furniture needs more involved preparation.
Key Takeaways
- Assess the furniture’s existing finish before choosing how to clean and prepare the wood.
- Match the stain type to the grain appearance and finish you want, then follow its application directions.
- Apply stain with the grain and manage additional coats while the first coat is still wet.
- Use a gradual sanding sequence to remove weathered finish without over-smoothing the wood.
- For furniture that needs careful restoration or a refined finish, explore professional wood staining and refinishing.
Allowing stained furniture to cure before use
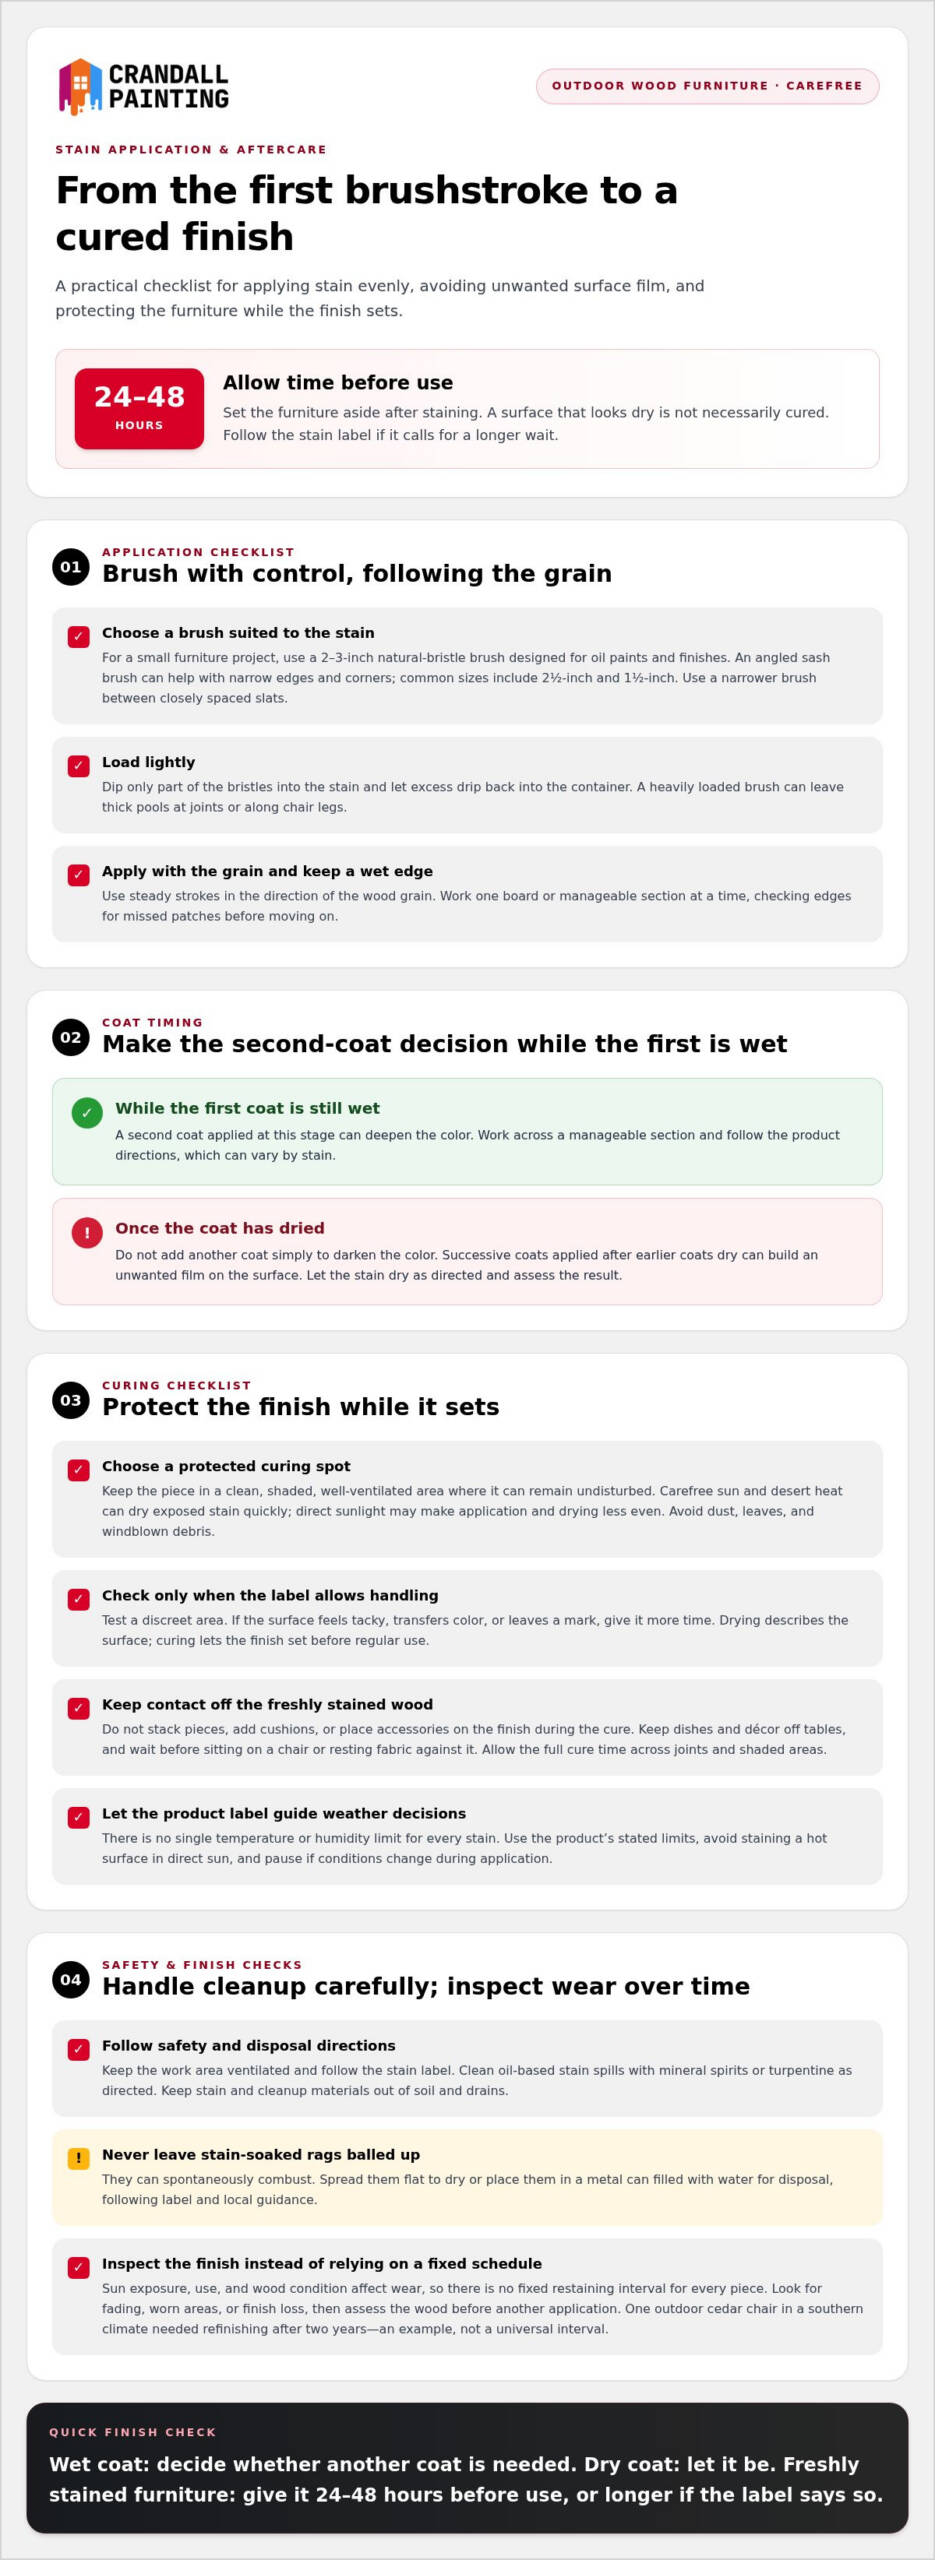
Set the furniture aside after staining; a dry surface and a cured finish are not the same. Allow 24-48 hours before use, and follow the stain label if it specifies a longer wait.
- Move the piece into a suitable curing spot. Choose a clean, shaded, well-ventilated area where furniture can remain undisturbed. In Carefree, intense sun and desert heat can dry exposed stain quickly, so direct sunlight may make application and drying less even. Work in shade and avoid placing freshly stained furniture where dust, leaves, or windblown debris can settle on it.
- Check the surface before treating it as dry. Touch a discreet area only after the stain’s label allows handling. If it feels tacky, transfers color, or leaves a mark, give it more time. Drying describes the surface; curing allows the finish to set before regular use. A dry-looking chair can still be vulnerable to pressure, cushions, or objects left against the stained wood.
- Keep the furniture clear during the cure. Don’t stack pieces, add cushions, or place accessories on newly stained surfaces. Contact can leave impressions or interrupt the finish as it sets. For a table, keep dishes and décor off the top; for a chair, wait before sitting or resting fabric against the arms. Give the entire piece the full 24-48 hours, including joints and shaded areas.
- Use the product directions to judge weather conditions. There is no single temperature or humidity limit that applies to every stain; use the limits on the product label. Avoid staining a hot surface in direct sun, and choose a time when the furniture can stay protected while drying. If conditions change during application, pause rather than rushing the finish.
- Plan maintenance by inspecting the finish. There is no fixed restaining interval for every Carefree furniture piece; sun exposure, use, and the wood’s condition affect wear. An outdoor cedar chair in a southern climate needed refinishing after two years. Look for fading, worn areas, or finish loss, then assess the wood before another application. Stain colors and finishes vary by product: Benjamin Moore describes translucent stain as showing the wood’s full beauty, while semi-transparent stain reveals most grain and texture.
Follow the stain label’s safety directions and keep the work area ventilated. Clean oil-based stain spills with mineral spirits or turpentine. Never leave stain-soaked rags balled up: spread them flat to dry or place them in a metal can filled with water for disposal, because they can spontaneously combust.
Applying a second coat while the first coat is wet
A brush gives you control, especially around slats, joints, and shaped edges. Work methodically for even coverage, following the stain manufacturer’s directions.
In Carefree, follow the stain label and applicable local disposal guidance. Keep stain and cleanup materials out of soil and drains, and follow the product’s instructions for disposing of leftovers.
- Choose a brush suited to the stain. For a small furniture project, use a 2-3-inch natural-bristle brush designed for oil paints and finishes. An angled sash brush can help reach narrow edges and corners; common choices include 2½-inch and 1½-inch sizes. Match the brush width to each surface, using a narrower brush between closely spaced slats.
- Load the brush without saturating it. Dip only part of the bristles into the stain, then let excess drip back into the container. A heavily loaded brush can leave thick pools at joints or along the lower edge of a chair leg. Work over a protected surface, and keep a clean cloth nearby for accidental drips.
- Follow the wood grain. Apply exterior stain by brush in the direction of the grain. Use steady strokes along a board or slat, then check edges for missed patches before moving on. On a chair seat, finish one board at a time; this helps you maintain a consistent wet edge and notice uneven coverage while it can still be worked.
- Decide on a second coat while the first remains wet. A second coat applied while the first is still wet can deepen the color. Work across a manageable section, such as one chair arm or tabletop board, so you can see the first coat’s condition before continuing. Follow the product directions, since the recommended application can vary by stain.
- Stop before coats begin to dry. Don’t apply additional coats of exterior stain after earlier coats have dried; repeated dry coats can build a film on the surface. If the first coat is no longer wet, don’t add another coat simply to darken the color. Allow the stain to dry as directed, then assess the result before planning future maintenance.
- Handle cleanup and disposal carefully. For oil-based stain spills, use mineral spirits or turpentine as directed by the product label. Stain-soaked rags can spontaneously combust if balled up. Spread them flat to dry or place them in a metal can filled with water for disposal, following the label and applicable local guidance.
Decide on the color as you brush, rather than trying to correct it later. Apply exterior stain to outdoor wood furniture with a brush, following the grain, and assess the first coat while it is still wet. Applying another coat at that stage can deepen the color. Once the coat has dried, avoid adding successive layers, which can build a film on the surface. If the wet stage has passed, let the coat dry instead of applying another layer to darken the finish.
Removing old finish and weathered wood by sanding
Sand in stages to remove failing finish and prepare the surface for stain. Follow the grain, and stop before the wood becomes overly smooth.
-
Sanding away old finishes
Start with 80-grit sandpaper on areas holding a weathered or peeling finish, moving with the grain. Use light, controlled pressure, especially on narrow chair slats and edges where aggressive sanding can alter the shape. Check your progress often; the goal is to remove the old finish and leave a consistent surface, not to cut deeply into sound wood.
-
Sanding weathered wood
For exposed, roughened wood, begin with coarse sandpaper in the 40- to 80-grit range, then refine the surface. A practical sequence is 80 grit, 120 grit, and 180 grit, always sanding with the grain. Stop around 180 grit; sanding finer can leave wood less able to absorb stain. Use lighter pressure on thin boards and shaped edges.
- Blend the surface gradually. After the first pass, inspect each board in steady light. If old finish remains in a crevice, use folded sandpaper to reach the spot without scouring nearby wood. Move from 80-grit to 120-grit paper, then finish with 180-grit paper. This progression helps remove coarse scratches from earlier sanding while keeping the surface receptive to stain.
Don’t jump straight from rough paper to a fine grade. Deep scratches may show through translucent stain, while excessive sanding can smooth the wood and reduce absorption. Sand in the same direction across each panel, avoiding circular motions that leave marks across the grain.
- Remove sanding residue before staining. After the final pass, clear dust from joints, corners, and flat panels. The U.S. Environmental Protection Agency describes wood panels being lightly sanded and dusted before staining. Use a clean dusting method and inspect the surface in angled light: leftover powder can mix with stain and create a rough, uneven appearance.
Run a clean hand over the boards to find rough patches, then correct only those areas with the appropriate grit. Dust the furniture again. Wait to stain until the surface is clean and dry, with no loose finish or visible sanding debris.
When sanding outdoor wood furniture, work with the grain, starting with coarse sandpaper and then switching to fine sandpaper. Keep that direction steady as you move across each piece, rather than changing the angle from one pass to the next. Use deliberate, even strokes and let the paper do the work; pressing harder is not a substitute for a controlled pass. Treat each section in turn, carrying the same coarse-to-fine progression across adjoining areas so the surface is prepared consistently. At the change in paper grade, take a moment to check the area and make sure the next pass follows the same grain direction.
Pay particular attention to transitions between broad boards and narrow or shaped parts. Adjust your hand position so the paper stays in contact with the wood without catching an edge or crossing the grain. Keep the sanding focused on the surface being prepared, and use lighter, more measured strokes where the shape makes control difficult. A steady sequence helps you avoid uneven handling while preparing the furniture for its next finish.
Water-based versus oil-based stains
- Choose an exterior stain for the furniture and finish you want. For outdoor furniture in Carefree, select a product whose label directs its use on exterior wood. Water-based and oil-based stains can both suit a project when their labels specify the intended use. There isn’t one best base for every piece; compare the product directions, the wood’s condition, your preferred appearance, and cleanup requirements before deciding. A stain intended for outdoor wood is a more suitable starting point than one without exterior-use directions.
- Compare product labels, not just the base. Read the directions for surface preparation, application, drying, and any recommended additional coat. Those instructions can differ between products, including water-based and oil-based options. Check that the directions fit the furniture’s wood and your planned working conditions. If you’re choosing between two stains, apply a small sample to an inconspicuous area and review the color after it dries. That helps reveal how the particular wood changes the stain’s appearance.
- Let the desired look guide your selection. Translucent stain allows the wood’s full beauty to show through, according to Benjamin Moore. Semi-transparent stain allows most of the wood grain pattern and texture to remain visible, also according to Benjamin Moore. These finish descriptions refer to appearance, not whether a stain is water-based or oil-based. Decide how much grain you want to see, then compare exterior products that offer that finish and follow their directions.
- Prepare for oil-based cleanup before you begin. Keep mineral spirits or turpentine available for cleaning oil-based stain spills, following the product label. Protect nearby surfaces and use a suitable container for the stain, so spills are easier to manage. Avoid improvising with water for oil-based cleanup; use the cleanup method directed for that product. Handle any stain-soaked rags carefully: spread them flat to dry or place them in a metal can filled with water for disposal. Never leave them balled up, because they can spontaneously combust.
- Make the final choice by weighing the full process. Compare the finish you want, the application and drying directions, and the cleanup method for each product. For example, if a particular stain’s finish appeals to you but its directions don’t fit the furniture or working conditions, choose another exterior stain. A product label provides the specific instructions for that formulation; follow it from preparation through cleanup.
Preparing wood furniture and removing mildew
For wood staining for outdoor furniture in Carefree, follow a clear sequence: clean the piece, treat mild mildew, let the wood dry completely, then sand and remove dust. Stain only when the surface is clean, dry, and free of mold and mildew.
For mild mold or mildew stains, prepare a solution of one part household bleach to three parts water. Work carefully and inspect the wood before applying stain.
- Inspect the furniture before cleaning. Examine the top, underside, joints, and shaded areas where mildew can be easy to miss. Note dark marks, rough patches, and peeling finish. For example, a chair with marks on its seat and lower legs needs inspection in both places, not only on the most visible surface.
- Remove loose dirt and debris. Clear surface grime before treating mildew, paying attention to slats, corners, and board joints. Debris can hide discoloration or make it harder to see whether a marked area has been cleaned. Check around the whole piece, including the underside of a tabletop or chair seat.
- Treat mild mildew stains. Apply the one-part household bleach to three-parts-water solution to affected areas. Focus on visible staining instead of coating the furniture indiscriminately. Inspect the treated wood afterward. If mildew remains, address it before staining rather than covering it with finish.
- Allow the wood to dry completely. Set the furniture aside until no dampness remains, including inside joints and shaded sections. Outdoor wood must be completely dry and free of mold and mildew before staining. Check the underside as well as the sunlit surfaces, since drying can vary across one piece.
- Sand according to the wood’s condition. Use 40- to 80-grit paper for coarse preparation on rough areas, then refine with 180- to 220-grit paper. Follow the grain and use a light touch on thin slats and edges. This preparation helps make wood staining for outdoor furniture in Carefree more even by addressing roughness before applying the finish.
- Dust and inspect before staining. The U.S. Environmental Protection Agency describes wood panels being lightly sanded and dusted before staining. Remove residue from joints and flat boards, then check for dampness or remaining mildew. A clean, dry surface gives stain a prepared base; don’t proceed while visible debris or mildew remains.
Crandall Painting & Stucco: Exterior Painting
Crandall Painting & Stucco provides wood staining and refinishing for outdoor furniture that needs careful preparation or a refreshed finish. Consider professional help if mildew, weathering, or an uneven old coating makes the surface difficult to prepare, or if several pieces need a consistent appearance.
The right finish depends on the wood’s condition, its existing coating, and the look you want. Crandall Painting & Stucco also provides exterior painting, stucco repair, and interior painting, helping homeowners in Carefree and the Scottsdale and Phoenix area address related finish work through one company.
Explore Crandall Painting & Stucco’s wood staining and refinishing services, or contact the company to discuss your outdoor furniture project.
Give your outdoor furniture a considered refresh
A refreshed furniture finish can shape the feel of an outdoor living space. Before starting, decide whether the piece needs a simple refresh or more involved restoration, and consider how its color will complement your home. For wood staining for outdoor furniture in Carefree, let the look you want guide the project while giving careful attention to each piece’s condition.
If you’d rather leave the finish to experienced hands, Crandall Painting & Stucco provides wood staining and refinishing in Carefree and the Scottsdale and Phoenix area. Its services also include exterior painting, stucco repair, and interior painting, useful when a home needs coordinated finish work. Start with a conversation about the furniture and the result you have in mind; estimates are free and carry no obligation.
Contact Crandall Painting & Stucco to discuss your project and take the next step toward a thoughtfully refreshed outdoor space.
Frequently Asked Questions
What is the difference between oil-based, water-based, and semi-transparent exterior wood stains?
Oil-based and water-based describe a stain’s formulation; semi-transparent describes how much wood grain shows through. These terms aren’t direct alternatives: a semi-transparent stain also has a particular base. Benjamin Moore says semi-transparent stain allows most of the grain pattern and texture to remain visible. For outdoor furniture in Carefree, check the product label for exterior-use directions and test the chosen color in an inconspicuous spot before coating the whole piece.