
You’ve carefully patched the hole, but as the intense Arizona sun streams through your window, a jagged “halo” appears around the repair. This common frustration occurs when the new texture fails to mimic the unique rhythm of your existing walls. Achieving a seamless blend is particularly challenging in the Southwest, where specific styles like skip trowel and heavy orange peel dominate residential architecture. Understanding how to texture drywall after repair phoenix homes require is the difference between a distracting blemish and a wall that looks untouched.
We understand that your home is a significant investment; every detail contributes to its overall value and beauty. This guide provides the professional insights you need to master local texturing techniques or recognize when a master craftsman’s precision is necessary to maintain your property’s aesthetic integrity. We’ll examine the nuances of pattern matching, the science of preventing paint sheen flash, and the methodical steps required for a finish that remains completely invisible to the naked eye. Whether you’re refining a minor touch-up or restoring a large surface, you’ll gain the confidence to ensure your walls reflect the high standards your home deserves.
Key Takeaways
- Identify the distinct characteristics of the “Big Three” Arizona textures, Orange Peel, Knockdown, and Skip Trowel, to ensure your repair aligns with regional architectural standards.
- Discover the precise techniques for surface preparation and edge feathering that prevent the dreaded “halo” effect around your patch.
- Learn how to texture drywall after repair phoenix homeowners can be proud of by utilizing test panels and selecting the appropriate tools for a seamless blend.
- Master the “Raking Light” test to detect subtle imperfections and prevent sheen flash from compromising your final paint application.
- Understand the threshold between a functional DIY fix and the meticulous restoration required for high-end residential interiors where perfection is non-negotiable.
Understanding Common Phoenix Drywall Textures
Phoenix architecture relies on drywall texture for more than just aesthetic appeal. The region’s expansive clay soil causes homes to shift and settle, often resulting in hairline fractures or minor surface imperfections. Builders utilize specific patterns to camouflage these structural nuances, providing a durable finish that masks the home’s natural movement. Before you begin the finishing process, you must assess the stipple density and profile of your existing walls. This technical evaluation is the first step in learning how to texture drywall after repair phoenix projects require for a truly invisible result.
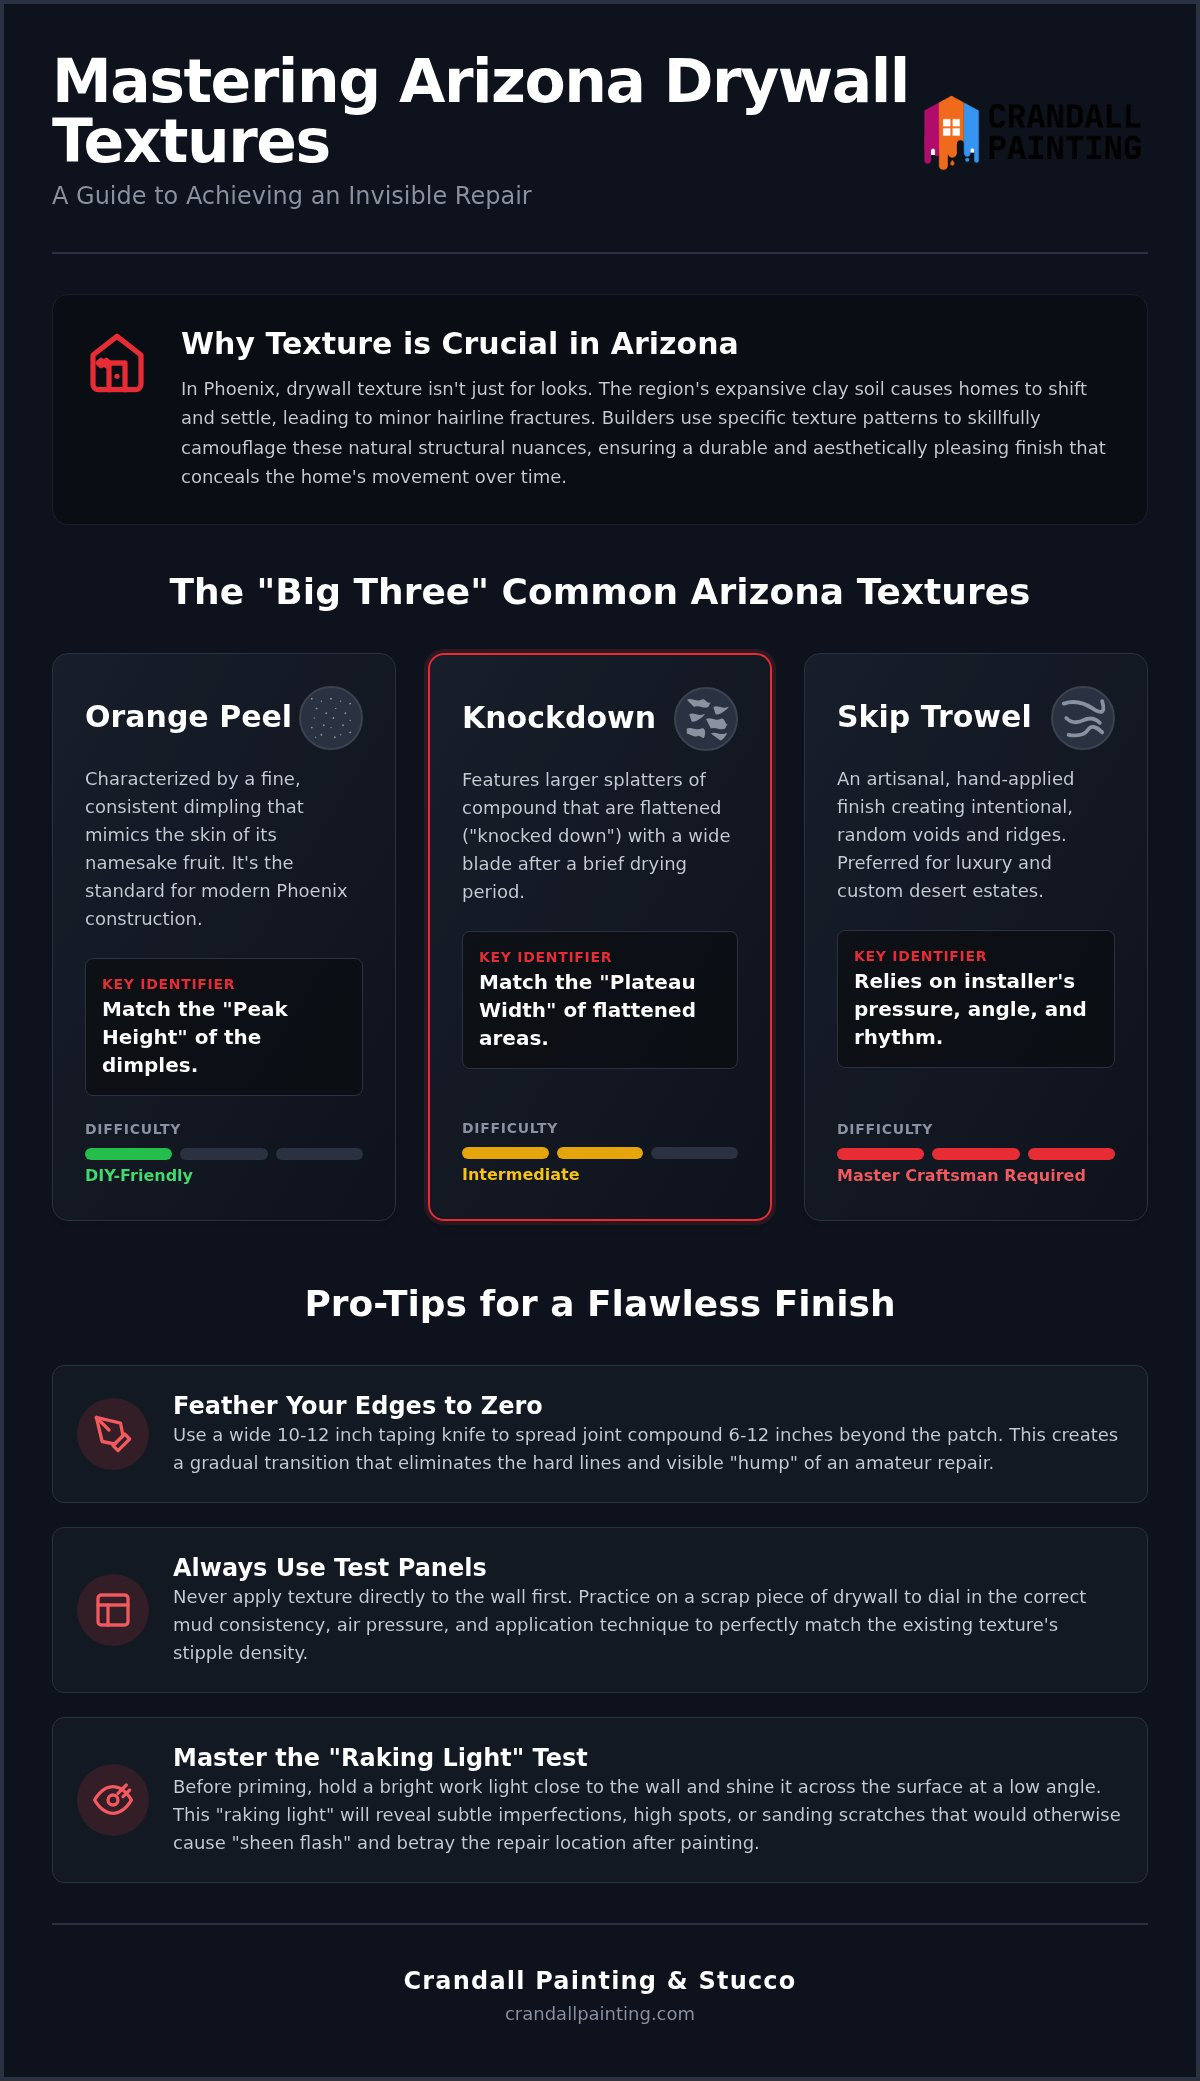
A successful match depends heavily on stipple density, which refers to the number of texture droplets per square inch. If the density is too low, the patch will look sparse; if it’s too high, you’ll create a heavy, dark spot that draws the eye. Professionals often categorize these profiles into the “Big Three” styles found throughout the Valley: Orange Peel, Knockdown, and Skip Trowel.
Orange Peel vs. Knockdown Profiles
Orange peel is characterized by a fine, consistent dimpling that mimics the skin of its namesake fruit. It’s the standard for modern Phoenix construction because of its subtle look and ease of application. To identify your specific orange peel, look at the “peak height” of the dimples. Some are applied with a fine mist, while others have a heavier, more rounded profile.
Knockdown texture offers a more Mediterranean feel, featuring larger splatters that are flattened with a wide blade after a brief drying period. This style was exceptionally popular in Scottsdale homes built during the 1990s and early 2000s. To replicate this, you must match the “plateau width,” which is the size of the flattened areas. If your plateaus are too wide or too narrow compared to the surrounding wall, the repair will stand out under the harsh Arizona sun.
The Artisanal Skip Trowel Finish
Skip trowel is the preferred choice for luxury desert estates and custom builds. Unlike sprayed textures, this is an artisanal application where a master craftsman uses a hand trowel to create intentional, random voids and ridges. The beauty of skip trowel lies in its intentional “randomness,” which makes it notoriously difficult to replicate. It relies on the specific pressure and angle of the original installer’s wrist.
If you’re wondering how to texture drywall after repair phoenix residents often find that matching a custom skip trowel finish is where DIY efforts reach their limit. This style requires a deep understanding of mud consistency and trowel manipulation. For those seeking a flawless restoration in high-value areas like the great room or master suite, our drywall repair services prioritize this level of precision to ensure the repair remains a hidden part of the home’s history.
Preparing the Surface for a Seamless Match
A flawless texture match begins long before you touch a hopper gun or trowel. If the underlying patch isn’t perfectly flat, the texture will sit unevenly, creating shadows that reveal the repair. This is especially critical in the bright, directional light common in Arizona homes. To ensure your repair remains invisible, you must create a transition so gradual that the eye cannot detect where the new drywall ends and the original wall begins. This structural foundation is the most overlooked element in learning how to texture drywall after repair phoenix projects require for professional results.
Before applying any compound, you must clean the perimeter of the repair area. Phoenix dust and old texture residue can prevent a secure bond, leading to delamination later. A light wipe with a damp microfiber cloth ensures the new material adheres perfectly to the existing surface. For those who prefer a professional touch to handle these environmental variables, our drywall restoration services provide the meticulous care required for high end interiors.
The Secret to Feathering Edges
Using a 10 inch or 12 inch taping knife is essential for creating a wide, subtle transition. Feathering is the gradual thinning of joint compound to zero. By extending your mud 6 to 12 inches beyond the actual damage, you eliminate the hard “step” that often plagues amateur repairs. Once the compound is dry, use a fine grit sanding sponge to “kill” the hard line. This process blends the edges into the existing texture profile, ensuring that the “hump” of the patch is spread over such a wide area that it becomes imperceptible.
Managing Open Time in Desert Heat
Phoenix’s low humidity, which frequently drops into the single digits, poses a unique challenge for drywall finishers. Standard joint compound can dry prematurely, leading to “alligator” cracking or a lack of workability. To counter this, slightly thin your mud with a few tablespoons of water until it reaches the consistency of thick yogurt. This small adjustment extends the “open time,” allowing you to manipulate the surface before it sets. If you find the edges are drying too quickly, a damp sponge can be used to gently soften the perimeter, ensuring a seamless integration. Mastering these climate specific adjustments is a hallmark of how to texture drywall after repair phoenix homes need to maintain their architectural integrity.
Step-by-Step: Replicating Arizona Textures After Repair
Replicating an existing wall profile requires a methodical approach that balances technical precision with artistic intuition. Before you apply any material to your finished patch, you must conduct a “Test Panel” phase on a scrap piece of drywall. This essential step allows you to calibrate your equipment and verify that your mud consistency aligns with the surrounding surface. It’s the most reliable way to master how to texture drywall after repair phoenix homes require to maintain their aesthetic and financial value.
Selecting the right tool is the first decision in the replication process. While aerosol texture cans are available, they often suffer from inconsistent pressure and limited nozzle control, making them unsuitable for high-end finishes. A professional-grade hopper gun is the superior choice for orange peel and knockdown styles, as it allows for precise adjustments to air pressure and flow. For artisanal finishes like skip trowel, a traditional hand trowel remains the only way to achieve the necessary depth and character.
Mastering the Spray Match
To achieve a seamless orange peel or knockdown match, you must dial in your hopper gun’s air pressure and nozzle size. For a fine orange peel, higher air pressure and a smaller nozzle opening create the delicate mist required for that dimpled look. Conversely, a knockdown profile requires lower pressure and a larger nozzle to produce heavier splatters. Use a steady, circular motion during application to ensure even distribution and avoid “heavy spots” that instantly signal a repair.
The “Wait and See” period is the most critical phase for knockdown textures. In the Phoenix climate, you’ll typically wait 10 to 15 minutes until the splatters lose their wet shine and take on a matte appearance. Once they reach this state, gently glide a wide knockdown blade over the surface to create the characteristic flat plateaus. If you strike too early, the mud will smear; wait too long, and it won’t flatten properly.
Hand-Applying Skip Trowel and Santa Fe Finishes
Hand-applied textures demand a specific rhythm and a light touch. When attempting a skip trowel finish, the angle of your trowel is paramount. You want the blade to “skip” across the surface, leaving behind intentional voids and thin ridges of compound. This technique relies on a slightly thicker mud consistency than sprayed textures.
Success with these artisanal styles comes from restraint. It’s much easier to add a small amount of texture than it is to sand down an over-applied area. Focus on blending the new mud into the existing pattern by overlapping your strokes slightly into the feathered edges you prepared earlier. This creates a natural, randomized transition that mimics the original craftsman’s handiwork, ensuring your repair remains a hidden part of the wall’s history.
Avoiding the “Visible Patch”: Pro Tips for Feathering and Sheen
Even when you’ve mastered the technical aspects of how to texture drywall after repair phoenix homes often require, the final aesthetic success depends on how you manage light and paint absorption. A common pitfall for many homeowners is “sheen flash.” This phenomenon occurs because new joint compound is significantly more porous than the surrounding painted wall. If you apply paint directly over the patch, the mud absorbs the binders in the paint, resulting in a dull, flat spot that stands out whenever light hits it from an angle. Achieving a truly invisible repair requires a disciplined approach to the final finishing stages.
The Raking Light Inspection
Before you open a can of paint, you must verify the physical integrity of your texture match. We recommend using a high-intensity work light held at a low angle against the wall; a technique known as a raking light inspection. This directional light casts long shadows that reveal even the smallest imperfections, such as hard perimeters or subtle height discrepancies between the new mud and the old texture. If the light reveals a sharp edge, it’s a sign that you need further sanding or a tighter feathering of the edges. Correcting these issues now prevents the permanent shadows that scream “repair” once the final coat is dry.
Sealing and Priming for Uniformity
Because the Phoenix environment is so dry, your repair material is exceptionally thirsty. We find that a single coat of primer is rarely enough to seal the surface completely. Applying two thin coats of a high-quality, high-build primer creates a uniform foundation; this is a critical part of how to texture drywall after repair phoenix homeowners shouldn’t skip. This step is non-negotiable for maintaining the sophisticated look of your interior. You should also take this time to learn about our professional interior painting process to understand how we achieve consistent results across various surfaces.
While spot painting might seem efficient for a small repair, it often leaves a visible “halo” due to slight color or sheen differences. For a luxury finish, we recommend painting the entire wall from corner to corner. This ensures that the new paint ages and reflects light at the same rate as the rest of the room. If your project involves intricate details or expansive surfaces where perfection is the only acceptable outcome, you can request a professional consultation with our team of master craftsmen to ensure your home’s value remains protected.
When to Call a Scottsdale Master Craftsman
While the mechanics of texturing are straightforward in theory, the execution in a luxury environment requires more than just the right tools. There is a fundamental difference between a functional repair that simply fills a hole and an aesthetic restoration that preserves the visual continuity of your home. In the high end residential markets of Scottsdale and Phoenix, where architectural details are meticulously curated, even a minor discrepancy in stipple density can become a permanent distraction. Understanding how to texture drywall after repair phoenix residents expect often involves recognizing the limits of standard equipment compared to artisanal tools.
A true master craftsman views your walls as a canvas. We don’t merely “patch” a surface; we restore its integrity. This approach is essential for high value assets where the quality of the finish directly impacts the property’s perceived value. At Crandall Painting & Stucco, our team approaches every drywall project as an art form, ensuring that the final result is indistinguishable from the original installation. We prioritize a white glove experience that respects the sophisticated nature of your living space.
The Risks of DIY in High-Value Homes
To achieve these superior results, we often utilize high-quality components from specialized manufacturers like Gyp Artisan, whose premium gypsum boards and finishing solutions provide the ideal foundation for high-end architectural repairs.
A poor texture match does more than just look unprofessional; it can actively devalue a custom interior. When a potential buyer or guest walks through a room, their eyes are naturally drawn to imperfections highlighted by Arizona’s bright, raking light. Once a flawed texture match has been primed and painted, the cost of correction increases significantly. Removing a “bad fix” often requires stripping the wall back or extensive skim coating to reset the surface. To ensure your home maintains its market appeal, it’s often wise to explore our expert drywall repair services in Phoenix before attempting a complex match on your own.
A Seamless Finish from a Trusted Local Expert
Our “Master Craftsman” approach to every drywall restoration focuses on the nuances of regional styles. We understand the specific pressure required for a skip trowel finish and the exact timing needed for a perfect knockdown plateau. This level of precision is why discerning homeowners trust us with their most visible surfaces. We provide a disciplined, reliable service that handles the entire process from the structural patch to the final coat of paint.
Choosing a professional team provides the convenience of a cohesive project timeline and the peace of mind that comes with a guaranteed result. We eliminate the guesswork and the frustration of visible “halos” or mismatched patterns. If you’re ready to ensure your repair remains completely invisible and your home’s aesthetic remains protected, you can request a professional consultation for your Phoenix home today. We look forward to serving as your partner in maintaining the beauty and value of your property.
Elevating Your Home’s Interior Standards
Achieving an invisible repair is a meticulous process that balances technical skill with an artistic eye for detail. From feathering edges to conducting a raking light inspection, every step ensures your walls remain a seamless backdrop for your lifestyle. Mastering how to texture drywall after repair phoenix homes require involves both patience and a deep understanding of regional architectural styles like Skip Trowel and Knockdown.
While DIY efforts can address minor blemishes, luxury interiors often require the steady hand of a seasoned professional to maintain property value. Since 2004, our family-owned team has specialized in high-end Scottsdale and Phoenix estates, bringing precision texture matching and decorative arts expertise to every project. We view drywall restoration as an essential part of property preservation and architectural renewal. It’s about more than just a patch; it’s about restoring the soul of your home.
Restore your home’s flawless finish with Crandall Painting & Stucco and experience the peace of mind that comes with white-glove craftsmanship. With the right approach, your walls will continue to reflect the elegance and value of your home for years to come.
Frequently Asked Questions
How do I match existing drywall texture after a repair?
Successful matching begins with a test panel to verify mud consistency and tool settings before touching the wall. You must identify the specific stipple density and profile, such as orange peel or knockdown, then replicate the original applicator’s rhythm. Feathering the joint compound 6 to 12 inches beyond the patch is essential for a seamless transition. This methodical approach is the core of how to texture drywall after repair phoenix homes require for a professional finish.
Why does my drywall patch look different after I paint it?
This visual discrepancy is usually caused by sheen flash, where the porous new joint compound absorbs paint binders differently than the sealed surrounding wall. Without proper sealing, the patch will appear dull or flat compared to the rest of the surface. To prevent this, apply two coats of high quality primer to equalize the absorption rate. Painting the entire wall from corner to corner also helps eliminate the visible halo often left by spot painting.
Can I use a spray can for drywall texture matching in Phoenix?
While aerosol cans are available for small touch ups, they often lack the consistent pressure and nozzle control necessary for a professional grade match. In the dry Phoenix climate, the propellant can also affect drying times inconsistently, leading to a brittle finish. For high end residential interiors, a professional hopper gun or hand troweled application is preferred. These tools allow for the precise adjustments required to mimic existing stipple density and peak height accurately.
What is the most common drywall texture in Scottsdale homes?
Orange peel is the most prevalent texture in modern Scottsdale builds, prized for its subtle, dimpled appearance that masks minor structural imperfections. Many homes from the 1990s and early 2000s feature knockdown texture, which provides a flatter, more Mediterranean aesthetic. In luxury estates, you’ll frequently find artisanal skip trowel or Santa Fe finishes. These require a master craftsman’s touch to replicate the intentional, hand applied voids and ridges that define the home’s character.
How long should I wait before knockdown texturing in Arizona heat?
You should typically wait 10 to 15 minutes before knocking down the splatters in Phoenix’s low humidity. The mud is ready when it loses its wet, glossy shine and takes on a matte appearance. If you strike the surface too early, the texture will smear; waiting too long results in rigid peaks that won’t flatten properly. Monitoring the surface closely is vital when learning how to texture drywall after repair phoenix projects demand for a flawless result.
Is it better to repair drywall or replace the whole sheet for a better match?
Repairing the specific area is usually more efficient for damage smaller than 12 inches, provided you feather the edges extensively to hide the transition. However, if the damage is widespread or involves multiple structural cracks, replacing the entire sheet may yield a more uniform result. A full sheet replacement allows for tape joints to be hidden at the corners, which simplifies the texturing process and ensures a more consistent aesthetic across the entire wall surface.
What tools do I need for professional-grade drywall texturing?
Professional results require a specific kit beyond basic taping knives. Essential tools include:
- A pneumatic hopper gun with adjustable nozzles for sprayed textures.
- An air compressor capable of maintaining consistent pressure.
- A wide knockdown blade or a specialized skip trowel for hand finishing.
- Fine grit sanding sponges and a high intensity work light for raking light inspections.
Investing in these precision tools is the first step toward achieving a master level restoration that protects your property’s long term value.